19 KiB
Installation of OpenVINO™ Notebooks
@sphinxdirective
.. meta:: :description: An installation guide for Jupyter notebooks on which Python tutorials run. The tutorials serve as introduction to the OpenVINO™ toolkit.
The notebooks can be run in various environments. This guide will show you how to run and manage them on your local system.
Contents:
Installation Guide <#installation-guide>__Run the Notebooks <#run-the-notebooks>__Manage the notebooks <#manage-the-notebooks>__Troubleshooting <#troubleshooting>__
Installation Guide ##################
The table below lists the supported operating systems and Python versions.
+-------------------------------------+--------------------------------+
| Supported Operating System (64-bit) | Python Version | | | (64-bit | | | ) <https://www.python.org/>__ |
+=====================================+================================+
| Ubuntu 18.04 LTS | 3.7, 3.8, 3.9, 3.10. 3.11 |
+-------------------------------------+--------------------------------+
| Ubuntu 20.04 LTS | 3.7, 3.8, 3.9, 3.10, 3.11 |
+-------------------------------------+--------------------------------+
| Red Hat Enterprise Linux 8 | 3.8, 3.9, 3.10, 3.11 |
+-------------------------------------+--------------------------------+
| macOS 10.15.x versions | 3.7, 3.8, 3.9, 3.10, 3.11 |
+-------------------------------------+--------------------------------+
| Windows 10 Pro, Enterprise | 3.7, 3.8, 3.9, 3.10, 3.11 |
| or Education editions | |
+-------------------------------------+--------------------------------+
| Windows Server 2016 or higher | 3.7, 3.8, 3.9, 3.10, 3.11 |
+-------------------------------------+--------------------------------+
OpenVINO Notebooks also require Git. Follow the guide below for your operating system or environment.
Installing prerequisites +++++++++++++++++++++++++++
.. tab-set::
.. tab-item:: Windows :sync: windows
  1. **Install Python**

     Download 64 bit version of Python software (3.7, 3.8, 3.9, 3.10, 3.11) from `python.org <https://www.python.org/downloads/windows/>`__

     Run the installer by double clicking it. Follow the installation steps to set up the software.

     While installing, make sure you check the box to *add Python to system PATH*.

     .. note::

        Python software available in the Microsoft Store is not recommended. It may require additional packages.

  2. **Install GIT**

     Download 64 bit version of GIT from `git-scm.org <https://github.com/git-for-windows/git/releases/download/v2.36.0.windows.1/Git-2.36.0-64-bit.exe>`__

     Run the installer by double clicking it. Follow the installation steps to set up the software.

  3. **Install C++ Redistributable (For Python 3.8 only)**

     Download 64 bit version of  C++ Redistributable from `here <https://download.visualstudio.microsoft.com/download/pr/4100b84d-1b4d-487d-9f89-1354a7138c8f/5B0CBB977F2F5253B1EBE5C9D30EDBDA35DBD68FB70DE7AF5FAAC6423DB575B5/VC_redist.x64.exe>`__

     Run the installer by double clicking it. Follow the installation steps to set up the software.
.. tab-item:: Linux :sync: linux
  1. **Install Python and GIT**

     .. note::

        Linux Systems may require installation of additional libraries.

     The following installation steps should work on a clean install of Ubuntu Desktop 20.04, and should also work on Ubuntu 22.04 and 20.10, and on Ubuntu Server.

     .. code-block:: sh

        sudo apt-get update
        sudo apt-get upgrade
        sudo apt-get install python3-venv build-essential python3-dev git-all

     For an Intel Integrated Graphics Card, you can install the `Intel Graphics Compute Runtime <https://github.com/intel/compute-runtime>`__ to enable inference on this device. The command for Ubuntu 20.04 is:

     .. note::

        Only execute this command if you do not yet have OpenCL drivers installed.

     .. code-block:: sh

        sudo apt-get install intel-opencl-icd


     The following installation steps should work on a clean install of Red Hat, CentOS, Amazon Linux 2 or Fedora. If any issues occur, see the `Troubleshooting <#-troubleshooting>`__ section.

     .. code-block:: sh

        sudo yum update
        sudo yum upgrade
        sudo yum install python36-devel mesa-libGL
.. tab-item:: macOS :sync: macos
  Alternatively, you may skip steps 1-3 if you prefer to manually install `Python 3 <https://www.python.org/>`__ and `Git <https://git-scm.com/>`__.

  1. **Install Xcode Command Line Tools**

     .. code-block:: sh

        xcode-select --install

  2. **Install Homebrew**

     .. code-block:: sh

        /bin/bash -c "$(curl -fsSL https://raw.githubusercontent.com/Homebrew/install/HEAD/install.sh)"
        After you install it, follow the instructions from the Homebrew installation to set it up.

  3. **Install Python and dependencies**

     .. code-block:: sh

        brew install python@3.9
        brew install protobuf


     Run each step below in a terminal.

     .. note::

        If OpenVINO is installed globally, do not run any of these commands in a terminal where ``setupvars.sh`` is sourced.
.. tab-item:: Azure ML :sync: azure-ml
  .. note::

     An Azure account and access to `Azure ML Studio <https://ml.azure.com/>`__ are required.

  1. **Adding a Compute Instance**

     In Azure ML Studio, `add a compute instance <https://docs.microsoft.com/en-us/azure/machine-learning/how-to-create-manage-compute-instance?tabs=python>`__ and pick any CPU-based instance. At least 4 CPU cores and 8GB of RAM are recommended.

     |ml-studio-1|

  2. **Start the Terminal**

     Once the compute instance has started, open the terminal window and then follow the installation steps below.

     |ml-studio-2|
.. tab-item:: Docker :sync: docker
  To run the notebooks inside a Linux-based Docker container, use the Dockerfile:

  .. code-block:: sh

     :caption: Source: https://github.com/openvinotoolkit/openvino_notebooks/blob/main/Dockerfile

     FROM quay.io/thoth-station/s2i-thoth-ubi8-py38:v0.29.0

     LABEL name="OpenVINO(TM) Notebooks" \
       maintainer="helena.kloosterman@intel.com" \
       vendor="Intel Corporation" \
       version="0.2.0" \
       release="2021.4" \
       summary="OpenVINO(TM) Developer Tools and Jupyter Notebooks" \
       description="OpenVINO(TM) Notebooks Container"

     ENV JUPYTER_ENABLE_LAB="true" \
       ENABLE_MICROPIPENV="1" \
       UPGRADE_PIP_TO_LATEST="1" \
       WEB_CONCURRENCY="1" \
       THOTH_ADVISE="0" \
       THOTH_ERROR_FALLBACK="1" \
       THOTH_DRY_RUN="1" \
       THAMOS_DEBUG="0" \
       THAMOS_VERBOSE="1" \
       THOTH_PROVENANCE_CHECK="0"

     USER root

     # Upgrade NodeJS > 12.0
     # Install dos2unix for line end conversion on Windows
     RUN curl -sL https://rpm.nodesource.com/setup_14.x | bash -  && \
       yum remove -y nodejs && \
       yum install -y nodejs-14.18.1 mesa-libGL dos2unix libsndfile && \
       yum -y update-minimal --security --sec-severity=Important --sec-severity=Critical --sec-severity=Moderate

     # GPU drivers
     RUN dnf install -y 'dnf-command(config-manager)' && \
         dnf config-manager --add-repo  https://repositories.intel.com/graphics/rhel/8.5/intel-graphics.repo

     RUN rpm -ivh https://vault.centos.org/centos/8/AppStream/x86_64/os/Packages/mesa-filesystem-21.1.5-1.el8.x86_64.rpm && \
         dnf install --refresh -y \
         intel-opencl-22.28.23726.1-i419.el8.x86_64 intel-media intel-mediasdk libmfxgen1 libvpl2 \
         level-zero intel-level-zero-gpu \
         intel-metrics-library intel-igc-core intel-igc-cm \
         libva libva-utils  intel-gmmlib && \
         rpm -ivh http://mirror.centos.org/centos/8-stream/AppStream/x86_64/os/Packages/ocl-icd-2.2.12-1.el8.x86_64.rpm && \
         rpm -ivh https://download-ib01.fedoraproject.org/pub/epel/8/Everything/x86_64/Packages/c/clinfo-3.0.21.02.21-4.el8.x86_64.rpm

     # Copying in override assemble/run scripts
     COPY .docker/.s2i/bin /tmp/scripts
     # Copying in source code
     COPY .docker /tmp/src
     COPY .ci/patch_notebooks.py /tmp/scripts
     COPY .ci/validate_notebooks.py /tmp/scripts
     COPY .ci/ignore_treon_docker.txt /tmp/scripts

     # Git on Windows may convert line endings. Run dos2unix to enable
     # building the image when the scripts have CRLF line endings.
     RUN dos2unix /tmp/scripts/*
     RUN dos2unix /tmp/src/builder/*

     # Change file ownership to the assemble user. Builder image must support chown command.
     RUN chown -R 1001:0 /tmp/scripts /tmp/src
     USER 1001
     RUN mkdir /opt/app-root/notebooks
     COPY notebooks/ /opt/app-root/notebooks
     RUN /tmp/scripts/assemble
     RUN pip check
     USER root
     RUN dos2unix /opt/app-root/bin/*sh
     RUN yum remove -y dos2unix
     RUN chown -R 1001:0 .
     RUN chown -R 1001:0 /opt/app-root/notebooks
     USER 1001
     # RUN jupyter lab build
     CMD /tmp/scripts/run
Installing notebooks ++++++++++++++++++++
.. tab-set::
.. tab-item:: Windows :sync: windows
  1. **Create a Virtual Environment**

     If you already have installed *openvino-dev*, you may skip this step and proceed with the next one.

     .. code-block:: sh

        python -m venv openvino_env

  2. **Activate the Environment**

     .. code-block:: sh

        openvino_env\Scripts\activate

  3. **Clone the Repository**

     Using the --depth=1 option for git clone reduces download size.

     .. code-block:: sh

        git clone --depth=1 https://github.com/openvinotoolkit/openvino_notebooks.git
        cd openvino_notebooks

  4. **Upgrade PIP**

     .. code-block:: sh

        python -m pip install --upgrade pip wheel setuptools


  5. **Install required packages**

     .. code-block:: sh

        pip install -r requirements.txt
.. tab-item:: Linux :sync: linux
  1. **Create a Virtual Environment**

     If you already have installed *openvino-dev*, you may skip this step and proceed with the next one.

     .. code-block:: sh

        python3 -m venv openvino_env

  2. **Activate the Environment**

     .. code-block:: sh

        source openvino_env/bin/activate

  3. **Clone the Repository**

     Using the --depth=1 option for git clone reduces download size.

     .. code-block:: sh

        git clone --depth=1 https://github.com/openvinotoolkit/openvino_notebooks.git
        cd openvino_notebooks

  4. **Upgrade PIP**

     .. code-block:: sh

        python -m pip install --upgrade pip
        pip install wheel setuptools

  5. **Install required packages**

     .. code-block:: sh

        pip install -r requirements.txt
.. tab-item:: macOS :sync: macos
  1. **Create a Virtual Environment**

     If you already have installed *openvino-dev*, you may skip this step and proceed with the next one.

     .. code-block:: sh

        python3 -m venv openvino_env

  2. **Activate the Environment**

     .. code-block:: sh

        source openvino_env/bin/activate

  3. **Clone the Repository**

     Using the --depth=1 option for git clone reduces download size.

     .. code-block:: sh

        git clone --depth=1 https://github.com/openvinotoolkit/openvino_notebooks.git
        cd openvino_notebooks

  4. **Upgrade PIP**

     .. code-block:: sh

        python -m pip install --upgrade pip wheel setuptools

  5. **Install required packages**

     .. code-block:: sh

        pip install -r requirements.txt
.. tab-item:: Azure ML :sync: azure-ml
  1. Create a Conda environment

     .. code-block:: sh

        conda create --name openvino_env python=3.8 -y

  2. Activate the environment

     .. code-block:: sh

        conda activate openvino_env

  3. Clone OpenVINO notebooks

     .. code-block:: sh

        git clone https://github.com/openvinotoolkit/openvino_notebooks.git

  4. Change directory to ``openvino_notebooks``

     .. code-block:: sh

        cd openvino_notebooks

  5. Upgrade ``pip`` and install required dependencies.

     .. code-block:: sh

        python -m pip install --upgrade pip
        pip install -r requirements.txt

  6. Add ``openvino_env`` to PATH

     .. code-block:: sh

        set PATH="/anaconda/envs/openvino_env/bin;%PATH%"

  7. Run the notebooks.

     To run the notebooks, click on Notebooks and refresh your Files:

     .. image:: https://user-images.githubusercontent.com/15709723/117580814-a725c300-b0ae-11eb-93bf-007779c26075.png

     .. image:: https://user-images.githubusercontent.com/15709723/117559447-2af19800-b03a-11eb-8bd6-8813b7a8814f.png

     .. image:: https://user-images.githubusercontent.com/15709723/117580973-37640800-b0af-11eb-91ae-7194b9b4e505.png

     .. note::

        Make sure you are using the ``openvino_env`` environment (not Python 3).

     .. image:: https://user-images.githubusercontent.com/1720147/162269003-7937b47c-484f-416c-97c7-bb869376ff68.png
.. tab-item:: Docker :sync: docker
  1. **Clone the Repository**

     .. code-block:: sh

        git clone https://github.com/openvinotoolkit/openvino_notebooks.git
        cd openvino_notebooks

  2. **Build the Docker Image**

     .. code-block:: sh

        docker build -t openvino_notebooks .

  3. **Run the Docker Image**

     .. code-block:: sh

        docker run -it -p 8888:8888 openvino_notebooks

     .. note::

        For using model training notebooks, allocate additional memory:

        .. code-block:: sh

           docker run -it -p 8888:8888 --shm-size 8G openvino_notebooks

  4. **Start the browser**

     | Copy the URL printed in the terminal window and open in a browser.
     | If it is a remote machine, replace 127.0.0.1 with the correct IP address.

     |docker-terminal-1|

     The Dockerfile can be used to run a local image on Windows, Linux or macOS.
     It is also compatible with Open Data Hub and Red Hat OpenShift Data Science.
     The base layer is a `UBI 8 <https://catalog.redhat.com/software/containers/ubi8/5c647760bed8bd28d0e38f9f?container-tabs=overview>`__-based image provided by `Project Thoth <https://thoth-station.ninja/>`__.

     .. note::

        While running the container on Windows and macOS, only CPU devices can be used. To access the iGPU, install the notebooks locally, following the instructions above.
Run the Notebooks #################
Launch a Single Notebook ++++++++++++++++++++++++
If you want to launch only one notebook, such as the Monodepth notebook, run the command below.
.. code:: bash
jupyter lab notebooks/201-vision-monodepth/201-vision-monodepth.ipynb
Launch All Notebooks ++++++++++++++++++++
.. code:: bash
jupyter lab notebooks
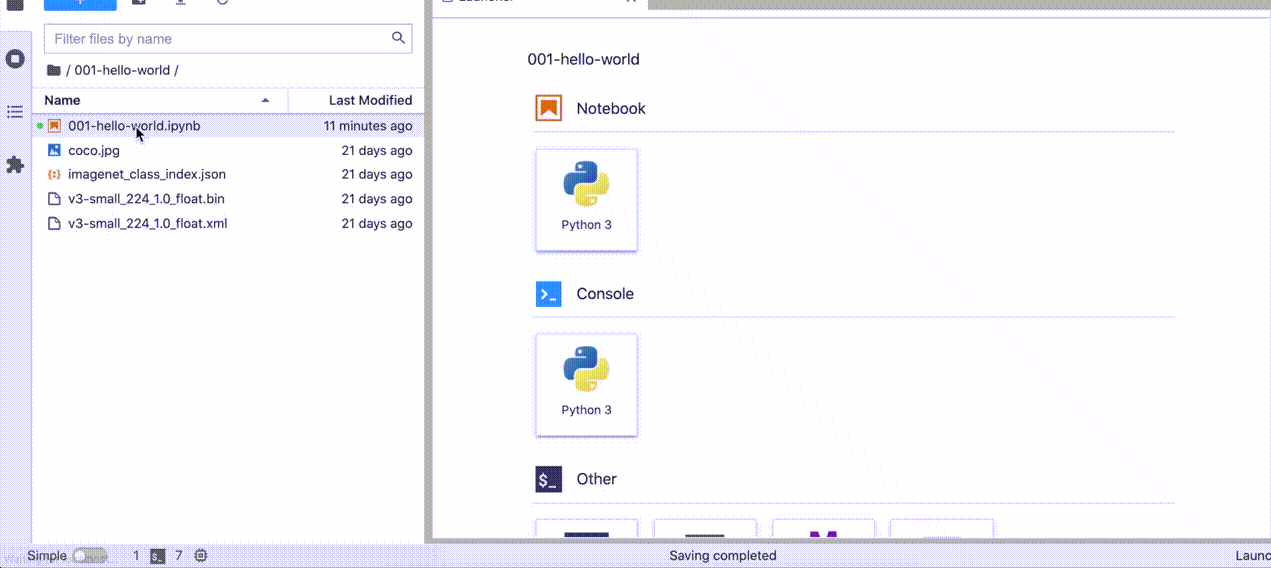
In your browser, select a notebook from the file browser in Jupyter Lab, using the left sidebar. Each tutorial is located in a subdirectory within the notebooks directory.
|launch-jupyter|
Manage the Notebooks ####################
Shut Down Jupyter Kernel ++++++++++++++++++++++++
To end your Jupyter session, press Ctrl-c. This will prompt you to
Shutdown this Jupyter server (y/[n])? enter y and hit Enter.
Deactivate Virtual Environment ++++++++++++++++++++++++++++++
First, make sure you use the terminal window where you activated openvino_env. To deactivate your virtualenv, simply run:
.. code:: bash
deactivate
This will deactivate your virtual environment.
Reactivate Virtual Environment ++++++++++++++++++++++++++++++
To reactivate your environment, run:
.. tab-set::
.. tab-item:: Windows :sync: windows
  .. code:: bash

     source openvino_env\Scripts\activate
.. tab-item:: Linux :sync: linux
  .. code:: bash

     source openvino_env/bin/activate
.. tab-item:: macOS :sync: macos
  .. code:: bash

     source openvino_env/bin/activate
Then type jupyter lab or jupyter notebook to launch the notebooks again.
Delete Virtual Environment ++++++++++++++++++++++++++
This operation is optional. However, if you want to remove your virtual environment, simply delete the openvino_env directory:
.. tab-set::
.. tab-item:: Windows :sync: windows
  .. code:: bash

     rmdir /s openvino_env
.. tab-item:: Linux :sync: linux
  .. code:: bash

     rm -rf openvino_env
.. tab-item:: macOS :sync: macos
  .. code:: bash

     rm -rf openvino_env
Remove openvino_env Kernel from Jupyter +++++++++++++++++++++++++++++++++++++++
.. code:: bash
jupyter kernelspec remove openvino_env
If you run into issues, check the Troubleshooting <#-troubleshooting>, and FAQs <#-faq> sections or start a GitHub
discussion <https://github.com/openvinotoolkit/openvino_notebooks/discussions>__.
Troubleshooting ###############
For solutions to common issues during installation, refer to the Troubleshooting <https://github.com/openvinotoolkit/openvino_notebooks#%EF%B8%8F-troubleshooting>__ and
FAQ <https://github.com/openvinotoolkit/openvino_notebooks#%EF%B8%8F-troubleshooting>__ sections in openvino_notebooks <https://github.com/openvinotoolkit/openvino_notebooks>__ repository.
If the above tips do not solve your problem, feel free to open a
discussion topic <https://github.com/openvinotoolkit/openvino_notebooks/discussions>__
or create an
issue <https://github.com/openvinotoolkit/openvino_notebooks/issues>__ on Github.
Additional Resources ####################
OpenVINO™ Notebooks - Github Repository <https://github.com/openvinotoolkit/openvino_notebooks/blob/main/README.md>_
.. |launch-jupyter| image:: https://user-images.githubusercontent.com/15709723/120527271-006fd200-c38f-11eb-9935-2d36d50bab9f.gif
.. |ml-studio-1| image:: https://user-images.githubusercontent.com/15709723/117559437-17463180-b03a-11eb-9e8d-d4539d1502f2.png
.. |ml-studio-2| image:: https://user-images.githubusercontent.com/15709723/117582205-b6f4d580-b0b5-11eb-9b83-eb2004ad9b19.png
.. |docker-terminal-1| image:: https://user-images.githubusercontent.com/15709723/127793994-355e4d29-d131-432d-a12a-b08ca6131223.png
@endsphinxdirective